After a severe storm rolls through North Texas, many homeowners are left asking the same question: how do I properly document roof damage? Whether the storm brought hail, high winds, or heavy rain, knowing how to document damage correctly can make a major difference in protecting your home and avoiding unnecessary complications later.
Documenting roof damage isn’t about jumping to conclusions or making assumptions—it’s about creating a clear, organized record of what you’re seeing and when you noticed it. This checklist walks Plano-area homeowners through the process step by step and explains when it’s time to involve a professional roofing expert like Vertice Roofing.
Step 1: Start With Safety and Timing
Before documenting anything, make sure it’s safe to do so.
After a storm, hazards like loose debris, slick surfaces, downed power lines, or unstable trees may still be present. Never climb onto your roof immediately after severe weather. Wet surfaces and hidden damage increase the risk of injury.
Instead, begin documentation from the ground as soon as conditions are safe. Timing matters—starting your documentation shortly after the storm helps establish a clear timeline and reduces the chance that damage worsens before it’s recorded.
Step 2: Record Basic Storm Information
The first item on your checklist is simple but important: record the details of the storm itself.
Write down:
- Date and approximate time of the storm
- Type of weather (hail, wind, heavy rain, or a combination)
- Any notable conditions (large hail, prolonged winds, sudden temperature changes)
This context helps establish when damage may have occurred and supports later conversations with roofing professionals or insurance representatives.
Step 3: Perform a Ground-Level Visual Inspection
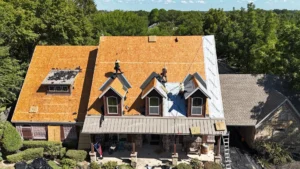
Next, walk around your property and look for visible signs of roof damage from the ground.
Things to document include:
- Missing, lifted, or visibly damaged shingles
- Debris on the roof or around the yard
- Shingle granules collecting near downspouts
- Bent or detached flashing
- Gutters pulling away or overflowing
Take photos from multiple angles. Even if damage looks minor, documenting it early creates a baseline in case conditions change later.
Step 4: Check Gutters, Downspouts, and Exterior Surfaces
Storm damage doesn’t always show up only on the roof surface.
Inspect and document:
- Dented or clogged gutters
- Downspouts knocked loose
- Siding dents or cracks
- Window trim or exterior vent damage
These issues can indicate the severity and direction of storm impact. They also help roofing professionals understand how wind and hail interacted with your home.
Step 5: Look for Interior Warning Signs
After documenting exterior conditions, move inside your home and check for interior indicators of roof damage.
Common signs include:
- Water stains on ceilings or walls
- Damp spots in attic insulation
- Dripping sounds or musty odors
- Peeling paint or bubbling drywall
Photograph any interior damage and note where it appears in relation to the roof above. Interior documentation often becomes important if leaks develop days or weeks after a storm.
Step 6: Take Clear, Organized Photos and Videos
Good documentation is about quality, not quantity.
When taking photos:
- Use natural lighting when possible
- Capture wide shots for context and close-ups for detail
- Photograph the same area from multiple angles
- Avoid blurry or overly zoomed images
Short videos can also be helpful for showing larger areas or patterns of damage. Organize your files by date and location so they’re easy to reference later.
Step 7: Avoid Temporary Repairs Without Documentation
It’s understandable to want to stop leaks quickly, but avoid making temporary repairs before documenting the damage.
If immediate action is necessary to prevent further interior damage, document the condition thoroughly first. Take photos before and after any temporary measures so there’s a clear record of what was addressed and why.
Permanent repairs should always wait until a professional evaluation has been completed.
Step 8: Schedule a Professional Roof Inspection
While homeowner documentation is valuable, it does not replace a professional assessment.
Scheduling a professional roof inspection allows trained experts to safely evaluate areas that aren’t visible from the ground. Vertice Roofing conducts thorough inspections that assess shingles, flashing, penetrations, drainage, and structural components.
Professional documentation provides clarity and helps homeowners understand whether damage is cosmetic, functional, or something that requires attention sooner rather than later.
Step 9: Request Written Findings and Photo Documentation
After the inspection, ask for written findings and photo documentation.
A reputable roofing company like Vertice Roofing explains:
- What damage was observed
- Where it’s located
- Whether it appears storm-related
- What options exist for addressing it
This documentation is useful for maintenance planning, budgeting, and informed decision-making—without jumping to conclusions or making assumptions about outcomes.
Step 10: Understand Next Steps Without Pressure
Documenting roof damage doesn’t automatically mean you need repairs or replacement.
Depending on findings, next steps may include:
- Monitoring minor issues
- Scheduling targeted roof repair
- Planning ahead for future work
- Taking preventative maintenance measures
Vertice Roofing focuses on helping Plano and North Texas homeowners understand their options clearly, without pressure or exaggerated claims.
Common Mistakes to Avoid When Documenting Roof Damage
Homeowners often make a few avoidable mistakes during this process:
- Waiting too long to document visible damage
- Climbing onto the roof without proper safety equipment
- Assuming damage is minor without inspection
- Discarding damaged materials before documenting them
- Relying solely on memory instead of photos and notes
Avoiding these mistakes helps preserve accurate records and reduces stress later.
Why Documentation Matters in North Texas
North Texas storms can be unpredictable and intense. Even when damage isn’t immediately obvious, small issues can worsen over time due to heat, sun exposure, and follow-up storms.
Proper documentation allows homeowners to stay proactive rather than reactive. It also makes professional evaluations more efficient, as inspectors have clear reference points from the start.
Vertice Roofing’s local experience in Plano and surrounding communities means they understand how regional weather patterns affect roofs—and how to document damage accurately.
A Simple Roof Damage Documentation Checklist
For quick reference, here’s a condensed checklist:
- Record storm date, time, and conditions
- Take ground-level exterior photos
- Document gutters, siding, and exterior features
- Check and photograph interior signs
- Organize photos and notes
- Schedule a professional inspection
- Save written findings and documentation
Following these steps creates a clear, organized record of your roof’s condition after a storm.
Final Thoughts: Documentation Is the First Step to Protection
Knowing how to document roof damage empowers homeowners to take control after a storm. Clear records reduce uncertainty, support informed decisions, and help professionals provide accurate guidance.
If your home has experienced severe weather and you’re unsure about your roof’s condition, working with trusted local experts like Vertice Roofing provides clarity and peace of mind. Proper documentation paired with professional evaluation is the smartest way to protect your home and plan confidently for what comes next.